 As you can read it before I started a big refactoring in my diabetes project.
One of the chosen tools which are useful for my beautiful project is gradle. It is really new topic in my coding life so I decided to investigate gradle and collect a little knowledge base here.
- plugins
- gradle init and build
- creating file structure
- description
- task dependencies
- default task
- repositories
- moving files
- GUI and test.html
- the commands which were used in this post
It is easy to install gradle. Just download all-binary zip, unpack it somewhere and set your PATH system environment variable to contain your gradle path. You should also set the GRADLE_HOME environment variable. Like this:
export GRADLE_HOME=/path/to/gradle/
export PATH=$GRADLE_HOME/bin:$PATH
To use gradle for building processes you need (gradle needs) a build configuration file called ‘build.gradle’. The first example in gradle’s website is:
task hello {
    dolast {
        println 'Hello world!'
    }
}
and you can deploy building with this command:
gradle -q hello
There you can see a -q option. That is for suppressing messages, in other words it is a quiet mode.
“The shorthand way to define a task…”
task hello2 << {
    println 'Hello world2!'
}
The simplest build.gradle file contains only one plugin request:
apply plugin: 'java'
A plugin provides some extra feature like import does in java. So they add new properties, methods, tasks to existing type. Official documentation here.
After using this command:
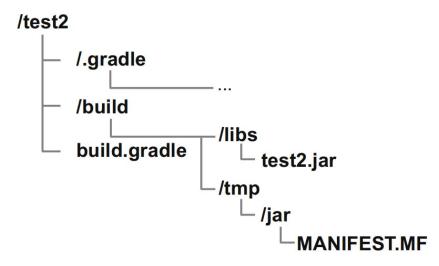
gradle build
You will get a filestructure as seen in this picture:
Two other plugins I will use are eclipse plugin and application plugin:
apply plugin: 'eclipse'
apply plugin: 'application'
eclipse plugin provides … as you can read on gradle’s online documentation site:
“The Eclipse plugin generates files that are used by the Eclipse IDE, thus making it possible to import the project into Eclipse (File – Import… – Existing Projects into Workspace). Both external dependencies (including associated source and javadoc files) and project dependencies are considered.”
Beside the eclipse plugin there is a plugin named eclipse-wtp.
“…if you are interested in WTP integration then only apply the eclipse-wtp plugin. Otherwise applying eclipse plugin is enough. This change was requested by Eclipse users who take advantage of war or ear plugin but they don’t use Eclipse WTP. Internally, eclipse-wtp also applies the eclipse plugin so you don’t need to apply both of those plugins. “
Let’s investigate a little bit these plugins. Create build.gradle files in an empty directory. Oh, no! Make two empty directories. Create build.gradles in each of them. In the first case make build.gradle with this content:
apply plugin: 'eclipse'
and in the other case create build.gradle file with this line in it:
apply plugin: 'eclipse-wtp'
Then try the following command in both of the dirs and watch the result.
gradle tasks --all
Usually we use these plugins together:
apply plugin: 'java'
apply plugin: 'eclipse'
apply plugin 'application'
and maybe
apply plugin: 'distribution'
The application plugin is needed when you want to run the application. So this plugin can make a package of yor application including runtime dependencies. Read more about the tasks which are added by this plugin here.
Include the plugin request and a propery setting this way:
apply plugin: 'application'

mainClassName = "org.gradle.sample.Main"
The trigger is:
gradle run
Building an initial (brand new) house or castle for your gradle controlled environment (using one of these two commands standing in an absolute empty directory):
gradle init
gradle init --type java-library
This is the difference between the previous two commands:
src/main/java/(Library.java)
src/test/java/(LibraryTest.java)
Now let us try a build process!
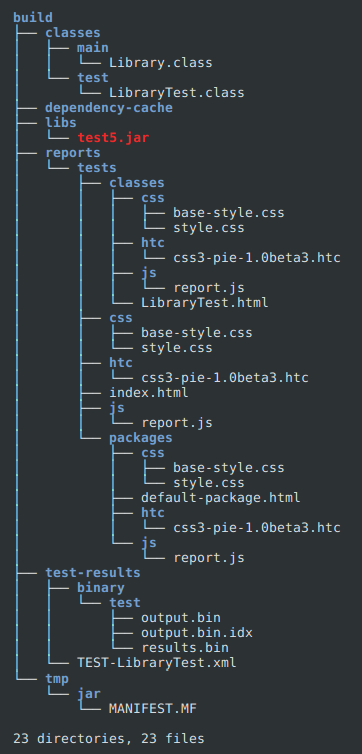
gradle build
Had it been created a file structure like in the following picture?
Another method how we can get a beautiful file structure under our project’s directory using build.gradle and a trigger command:
apply plugin: 'java'
apply plugin: 'eclipse'

task initSourceFolders << {
   sourceSets*.java.srcDirs*.each { it.mkdirs() }
   sourceSets*.resources.srcDirs*.each { it.mkdirs() }
}

task wrapper(type: Wrapper) {
    gradleVersion = '2.0'
}

repositories {
    mavenCentral()
}

dependencies {
    testCompile "junit:junit:4.11"
}
The trigger is:
gradle initSourceFolders eclipse
The first task is initSourceFolders and the second is eclipse. Yes, you can deploy more than one tasks in one go!
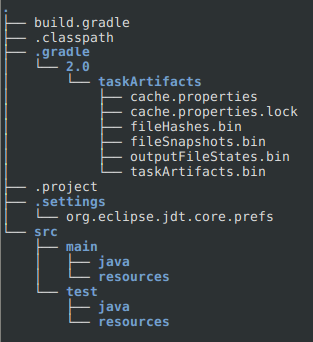
The result is seen here:
Description.
This is the way how you can definite description for your project inside build.gradle file:
taskName {
   description = 'Something interesting you want to show'
}
or using another form:
taskName.description = 'Something interesting you want to show'
And the command, which will show information which contains the description:
gradle -q projects
Here you can read more about this.
Task dependencies topic is more detailed here.
build.gradle:
task hello << {
    println 'Hello world!'
}
task intro(dependsOn: hello) << {
    println "I'm Gradle"
}
> gradle -q intro
Hello world!
I'm Gradle
There is no need to speak about this code. It explains itself well.
“…To add a dependency, the corresponding task does not need to exist.”
task taskX(dependsOn: 'taskY') << {
    println 'taskX'
}
task taskY << {
    println 'taskY'
}
> gradle -q taskX
taskY
taskX
Dependency across projects.
project('projectA') {
    task taskX(dependsOn: ':projectB:taskY') << {
        println 'taskX'
    }
}

project('projectB') {
    task taskY << {
        println 'taskY'
    }
}
Output of gradle -q taskX
> gradle -q taskX
taskY
taskX
Another way to the same result:
task taskX << {
    println 'taskX'
}

task taskY << {
    println 'taskY'
}

taskX.dependsOn taskY
You can read here what default task mean.
defaultTasks 'clean', 'run'

task clean << {
    println 'Default Cleaning!'
}

task run << {
    println 'Default Running!'
}

task other << {
    println "I'm not a default task!"
}
> gradle -q
Default Cleaning!
Default Running!
As can be seen here…
Some repository and dependency definition from the official documents (put them inside the build.gradle file:
repositories {
    mavenCentral()
}
repositories {
    maven {
        url "http://repo.mycompany.com/maven2"
    }
}
repositories {
    ivy {
        // URL can refer to a local directory
        url "../local-repo"
    }
}
But the way we can use for declaring dependencies inside our own file system is much more interesting!
This is my example build.gradle file first:
apply plugin: 'java'
apply plugin: 'eclipse'

repositories {
   flatDir(dirs: 'lib')
}

dependencies {
   testCompile fileTree('lib/test')
   compile 'joda-time:joda-time:2.4'
}

task initSourceFolders << {
   sourceSets*.java.srcDirs*.each { it.mkdirs() }
   sourceSets*.resources.srcDirs*.each { it.mkdirs() }
}
Using this trigger:
gradle check
or in any case of error
gradle check --debug
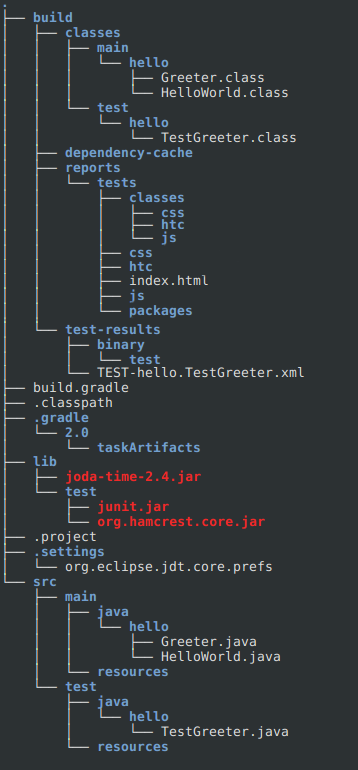
made the following result in my file system as you can see in the picture:
After the command ‘gradle build’ I got two more directories with files in them. Especially a build/resources/ directory whith these inside:
  main/test3.xml
  test/testTest3.xml
These two files came from
  src/main/resources/test3.xml
  src/test/resources/testTest3.xml
and build/libs/ directory where my project was placed in as a jar file.
At last this is a whole build.gradle which contains a lot of the things were mentioned in this post and a little more, the file copying and removing solutions:
apply plugin: 'java'
apply plugin: 'eclipse'

defaultTasks 'trigger'

repositories {
   flatDir(dirs: 'lib')
}

dependencies {
   testCompile fileTree('lib/test')
   compile 'joda-time:joda-time:2.4'
}

task initSourceFolders {
   description 'creates std file structure for java, \
          test and resources'
   sourceSets*.java.srcDirs*.each { it.mkdirs() }
   sourceSets*.resources.srcDirs*.each { it.mkdirs() }
}

jar {
    description 'creates jar; basename: testingGradle, \
           version: 0.0.77'
    baseName = 'testingGradle'
    version =  '0.0.77'
}

task copyTask(type: Copy) {
    description 'copies html, java, xml files from \
           myOwnSrcDir to myOwnDstDir. *.not \
           files are not copied at all'
    from 'myOwnSrcDir'
    into 'myOwnDstDir'
    include '**/*.html'
    include '**/*.java'
    include '**/*.xml'
    exclude '**/*.not'
}

task trigger(dependsOn: 'build') {
    description 'this is the default task in this project. \
           This task calls (depends on) build task'
}

task delMyDirX(type: Delete) {
    delete fileTree(dir: 'myOwnDstDir', include: '*.xml')
    description 'deletes all xml files in myOwnDstDir directory'
}

task delMyDir(type: Delete) {
    delete fileTree(dir: 'myOwnDstDir', \
                       exclude: 'dont_delete.xml')
    description 'deletes all files in myOwnDstDir \
                       except dont_delete.xml'
}

task cleanAllMyDir(type: Delete) {
    delete fileTree(dir: 'myOwnDstDir')
    description 'deletes all files in myOwnDstDir'
}

build.dependsOn copyTask
clean.dependsOn delMyDir
Line which is ending ‘\’ and the following line are the same!
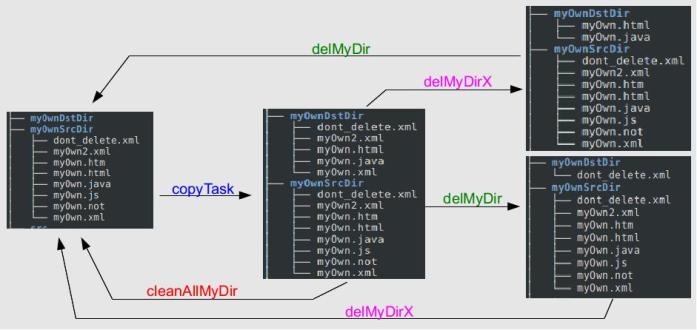
This is a graph of how the tasks affect each other.
Resources placed in
src/main/resources
and
src/test/resources
are automatically copied to
build/resources/main
and
build/resources/test/
Therefore there is no need to create task for this!
Two more candies after the ending of the post:
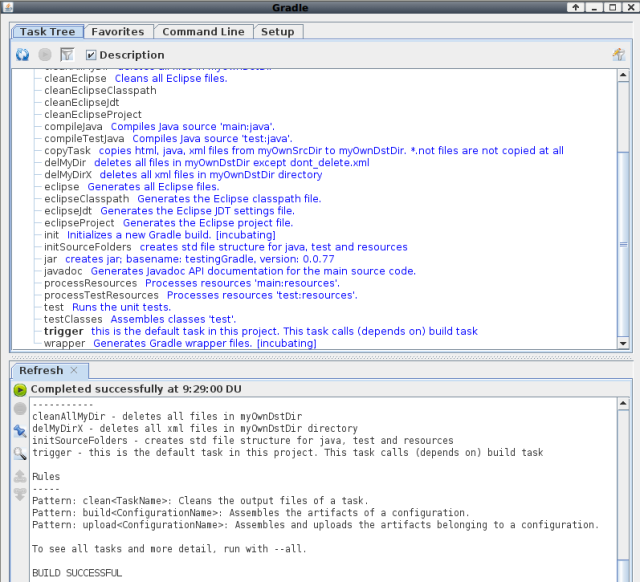
Do you know that there is a GUI shipped in the gradle package? Just type inside your gradle dir:
gradle --gui
You will get this great java application:
Gradle has one more great feature. Running tests creates beautiful html pages showing the test details, results. See the pictures below:
Gradle commands which were used in this post:
gradle tasks
gradle tasks --all
gradle run
gradle init
gradle init --type java-library
gradle properties
gradle projects
gradle -q check
gradle check --debug
gradle eclipse
gradle build
gradle compileJava
gradle testCompileJava
gradle --gui
and one more which was not in the post but it is good to know about it. Option to exclude task is:
gradle tasksToRun -x notToRun
jps, jstat




really good , thanks!
waiting for more
LikeLike
Thank you!
LikeLike